We Aussies have a deep-rooted passion for renovating old homes, cherishing the blend of historical charm with modern conveniences. This cultural affinity is driven by the desire to preserve the character of older homes while upgrading them with new fixtures and fittings to suit contemporary lifestyles. Beyond aesthetics, there is a growing recognition that older homes can be transformed to surpass the energy efficiency of many newly built properties. With advancements in insulation, windows, and energy-efficient appliances, these renovations not only enhance comfort but also significantly reduce energy consumption, making old homes both stylish and sustainable.
As we embark on these ambitious renovation projects, improving energy efficiency becomes a key focus. One effective way to enhance an older home’s thermal performance is by installing underfloor insulation, especially during periods when floorboards are removed, granting easy access to the joists. This provides a unique opportunity to thoroughly insulate the space, ensuring that your home retains heat during winter and remains cool in summer. By leveraging modern insulation techniques and materials, you can significantly reduce energy consumption and create a more comfortable living environment. Here’s how you can efficiently install insulation from above, maximizing both comfort and energy savings in your renovated home.
Fitting Insulation When the Floorboards Have Been Removed:
Fitting insulation from “the top” in an existing home, generally implies that you will not be able to access it from underneath in the future, or that access will be quite difficult. This makes it critically important that your method of securing your underfloor insulation lasts as long as your insulation. Polyester insulation has a warranty period of between 50 and 70 years, so its method of securing needs to last the same timeframe.
There are two potential methods of installation when fitting from the top. Both have advantages and drawbacks. They are:
- Fitting a supporting membrane under the joists and then simply dropping the insulation in. We have never used this method, but have repaired quite a few homes that have been installed this way.
- Stapling the insulation along the top of the joists. This is the method that we have used when fitting underfloor insulation from the top.
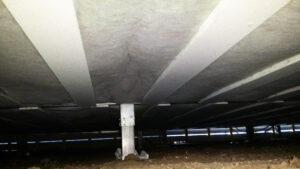
Option 1: Supporting Membrane Method:
Some people feel that this is potentially a better method of installation. To be fair, the idea of simply dropping the insulation in has great appeal. But, as always, the devil is in the detail. In this case, it’s the difficulty and potential failure risk of providing a long term supporting membrane under the existing joists that provides the main stumbling block. A minor detail with major impact!
Most commonly used supporting membrane is packing strapping or even nylon fishing line. Other potential membrane materials could be breather reflective foil, chicken wire (I kid you not!) or plastic barrier mesh (the kind of orange safety mesh typically set up in a temporary fashion between bollards).
The first thing to say here is that any random form of support, such as packing strap or nylon line, is to be discouraged. There will never be enough supports installed to hold your insulation firmly against your floor for the next 50 years. At best, you will achieve patchy insulation cover with equally patchy comfort and energy savings. At worst, you will be wasting your time, money and have life long issue of dealing with dead rodents under your floor.
If you need further convincing, visit our blog that demonstrates the failure of packing strap over time: Underfloor Insulation – 3 Reasons Why You Should Not Use Packing Strap.
The more substantial membranes are potentially a viable solution. The difficulty here is in securing them under the joists in a tight and complete manner. Perhaps these can be stapled up to the underside of the joists or perhaps they can be glued up with a “stick once” style of adhesive such as Fullers Toolbox that we use for Joisties (underfloor insulation for steel joists). Strong stuff!
Whatever the method, the last run is going to be the most difficult because now you will need to balance on top of the joists and somehow fit the final run of membrane across the room. Perhaps the best idea is to leave the last 300mm or 400mm without membrane so you can still stand on the ground to fit the last section. You can potentially tuck the last part of the polyester roll into the last bearer or glue the last little bit of the polyester roll to the side of the joists.
As you can see, this method is possible but does incur additional risk, significant labour and careful working out of the details. If you subscribe to the school of “out of sight, out of mind” you have never smelt a dead rat decomposing in a place that you simply cannot access.
Choose wisely.
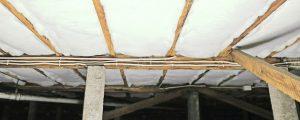
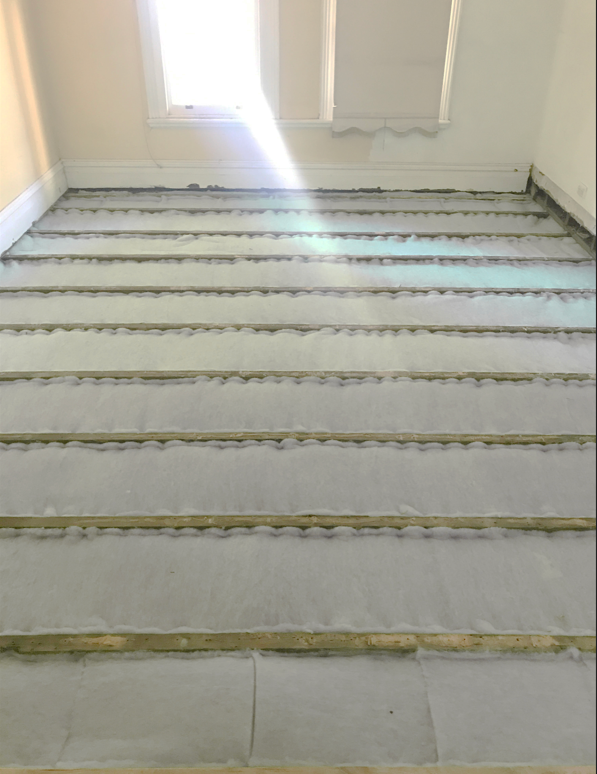
Option 2: Stapling Insulation to the Top of the Joists:
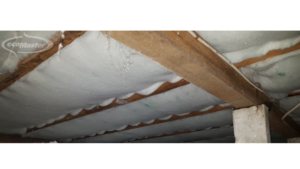
Stapling the insulation along the top edge of the joists is similar to stapling it to the bottom of the joists in a regular retrofit method. The main difference is that stapling from the top leaves a small gap between the insulation and the new floor.
Galvanised staples should be used every 100mm to 150mm to secure the insulation effectively. More staples are better than fewer. Here are some things to consider:
- If the insulation is bunched up, it means that the width of the insulation is too wide for the width of the space between the joists. That will encourage vermin to party in the gaps that have been created.
- When fitted from the top, the insulation must not bunch up and must be pulled tight and stapled securely along the joist (as per the image).
- In most instances there will be at least some “turn and tear” required. You can see that in the foreground of the image below where the insulation is installed across the joists rather than along the joists.
- Vermin don’t like polyester – they won’t eat it, nor will they take it away.
- To avoid a vermin party, ensure that your insulation completely fills the entire space from the yellow tongue or timber floorboards down to where it is stapled. This happens naturally when the material is stapled from the bottom of the joists.
- You will need a board to kneel on in order to fit the last run of insulation in the room.
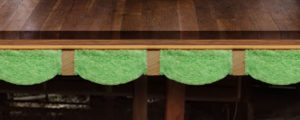
- Stapling from above dishes the material slightly away from the floor level. Once all the insulation is stapled in securely, it’s time to infill the voids. To do this, tear small sections off a roll, delaminate them (split into 2 or more thinner sections) and place over the stapled insulation to fill the dish to slightly more than floor level. That way, when the floor is installed over the top, it will slightly compress the insulation and ensure a full and complete thermal performance and vermin-proof cover.
Good luck with your project. If we can be of assistance in any way, please contact the team on 1300 326 627 or via our website.
CAN I STAPLE FIBREGLASS UNDER MY WOODEN FLOORS?
No. you can’t staple fibreglass (like earthwool, pink batts or gold batts) because the glass fibres are too small and too brittle to hold a staple.
CAN I FRICTION FIT INSULATION?
Technically yes, you can “friction fit” insulation between the joists. Friction fit means installing insulation without any kind of support whatsoever and hoping that the timber joists will hold the insulation in place. However, the forces of gravity, vibration of people walking, dancing, kids, pets or moving furniture will dislodge the insulation over time. It will end up on the ground under your inaccessible underfloor – useless and ineffective. Please, please don’t do this.
MORE INFORMATION:
We have a masterclass on underfloor insulation if you would like to learn more about underfloor insulation from the people who have installed more underfloor insulation than anyone else. Check it out. This masterclass was based on 20 years of insulation selection and installation distinctions. We have seen some real disasters in our time. Please don’t be one of them Learn more.